Sharing files from Office 365 OneDrive #
Microsoft O365 OneDrive (OD4B) allows you to share your content with Glow users and non-Glow users.
Why would I use it? #
You can share files such as Word documents, Excel spreadsheets, PowerPoint presentations, PDFs and images with non-Glow users.
Education options include:
As with everything in Glow, content should be appropriate for Glow, if you are unsure then please check the Glow Community Rules which should be followed at all times.
How do I get started? #
Sharing files #
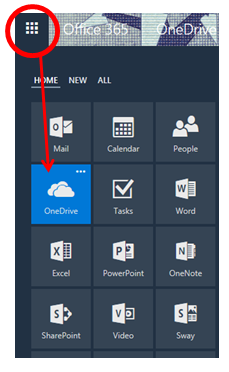
First, navigate to OneDrive from the O365 App Launcher:

You will be taken to the OneDrive screen which presents you with an overview of your files. All files in OneDrive are only accessible to you by default – not even system admins can access without taking steps that are recorded in a security log. Each file will have “Only you” in the ‘Sharing’ column. The exception is the ‘Shared with Everyone’ folder which has special permissions set to allow any Glow O365 user to access. (see ‘Shared with Everyone’ further below)
To begin sharing, select the file you wish to share and then click ‘Share’ at the top of the screen or select ‘Share’ from the ellipsis menu (…) as highlighted.

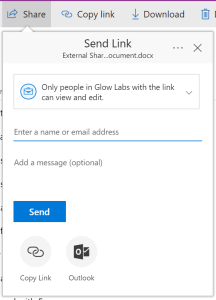
The Sharing dialogue window opens:

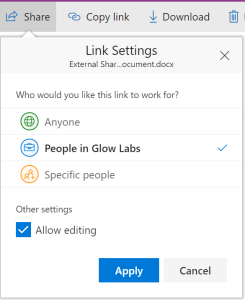
The default option is to generate a link that will allow any Glow user to edit your file. Links generated are long and complex making them very difficult to guess, so people will only be able to access your file if you give them the link or someone you give the link to passes it on. Generating the link by itself doesn’t change the visibility of your file for search or Delve but will allow anyone in Glow who has the link to view and edit your file. If you want to change these permissions, click on the drop down arrow at the right hand side. You will be presented with the Share options.

The options above are listed from top to bottom in descending order of exposure with the default ticked. To help you understand the consequences of each and make the best choice for your needs, we will start with the most controlled, ‘Specific people’, and work our way up the list. ‘Allow editing’ can be selected or deselected for the option you choose.
You have the following share options:
Some Glow users will have access to a ‘Shared with Everyone’ folder in OneDrive. Content saved there is accessible by all Glow users and not limited to your school or local authority. Please take care when using this folder as you may have information that should be private and not be made available to staff and pupils across Glow using this folder
Letting other users know they have access
You have two key ways of letting someone know they have access:
Removing Sharing
You can review, change or revoke the sharing status of any file at any time using the ‘i’ icon from the top menu or using the ‘Details’ option from the ellipsis menu.

